|
  

Fuel System
Running Total Hours:
0.0
 | 2006.05.23:
(0.0) Since I'm planning on
a fuel-injected engine, I'll need a high-pressure (25 psi) auxiliary
fuel pump, rather than the standard low-pressure pump used for carbureted
engines. I'm using Van's kit "7/7A F.I. PUMP INSTAL",
which includes an Airflow Performance p/n 3090050 boost pump package,
an Airflow Performance p/n 1090079 fuel filter, and various parts for
installation in the cockpit. The Airflow Performance 3090050
boost pump package consists of the following pre-assembled components:
p/n W-7135X pump motor, a 25 psi relief valve, a swing check valve for
bypass, and a manifold, fuel line, and fittings that put it all
together.
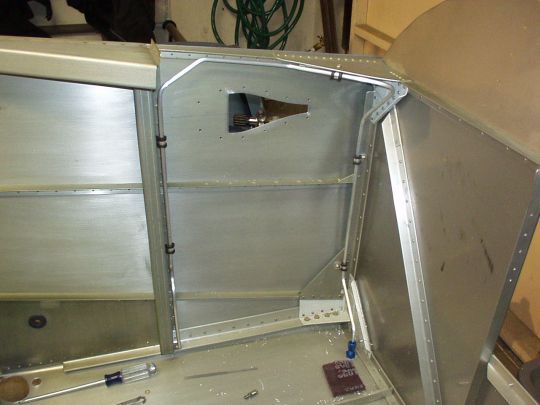
Unlike the standard low-pressure pump which mounts on the firewall,
the high-pressure pump mounts on the cockpit floor under the fuel
selector. This requires modifications to the cockpit structure in the
area of the fuel selector. See section Cockpit
Floors and Covers, entries starting with 2006.05.23. |
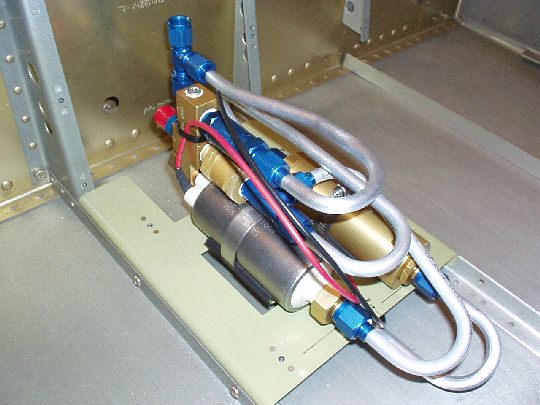
| 2006.07.08:
(1.0) Mounted the electric
fuel pump and fuel filter on the bottom cover plate. |
| 2006.07.14:
(3.0) Practicing and experimenting
working with the 3/8" aluminum tubing and tubing tools.
Measured that 3/8" tube should be cut approx 0.090" longer
at each end than the edge of the fitting it'll mate with for good fit
after flaring the end.
Found that the tubing bender I bought (Imperial 368-FH) will only do
up to 90 deg bends. Several attempts at several different
techniques to produce a 180 deg bend just didn't yield good
results. I decided to purchase another tool that's designed for
180 deg bends (Imperial 470-FH). [P.S. The 470-FH turned out to
be a better tool all around, able to do everything the 368-FH could do
and more. To my annoyance, the 368-FH cost me $41.60 and the
470-FH cost $27.60, both at Aircraft Spruce. Even more
infuriating, I later found a tubing bender that looked identical to
the 368-FH at Home Depot (apparently a generic knock off) for about
$10! @#$%! After seeing this, I went back and compared
pricing for other tubing tools. I found that Spruce was very
inconsistent on other tools as well. Sometimes they're
competitive, and sometimes they charge several times more than other
stores for the exact same item. Many of these very same tools
can be had at Home Depot or Sears for a fraction of the price.
Spruce shoppers beware!!!] |
| 2006.07.16:
(3.0) Started making my first fuel line,
from the fuel filter to the fuel pump bypass check valve (tee fitting
at the check valve also goes to fuel pump input port). The first
attempt came out nicely, except that the straight sections at the ends
weren't long enough to put on the AN819 sleeves and get the remaining
end of the tube into the flaring tool. The sleeves are approx
0.5" long and the flaring tool is approx 0.75" deep, so at
least 1.25" of straight section has to be left at each end of a
tube. |
| 2006.07.22:
(3.5) Finished making the
fuel line from the fuel filter to the fuel pump bypass valve.
Used a crow's foot perpendicular to the torque wrench to torque the
fittings.
I decided to use an Andair fuel selector valve instead of the valve
that comes standard in the kit. The decision wasn't aesthetic
(even though the Andair valve is a beautifully machined work of art,
and the standard valve from Van's looks like it belongs at the end of
a garden hose). The standard valve from Van's has a handle that
extends opposite to the selected tank, which I find objectionable from
a "human factors" standpoint. Also, there are tactile
detents in the three positions ("left", "right",
and "off") but no positive mechanism for ensuring the valve
is in the desired position. The Andair valves on the other hand
have a handle that clearly points to the selected tank. The
handle hits a positive stop at "left" and "right",
and a safety button has to be lifted to move the handle in or out of
the "off" position.
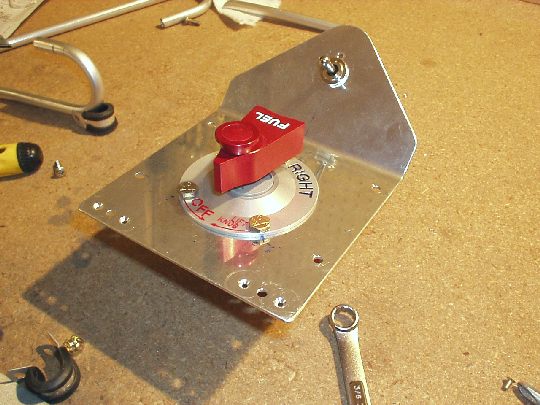
As another "human factors" improvement, I decided to mount
my fuel pump switch right above the fuel selector valve rather than in
a row of other switches on the panel. The fuel pump and fuel
selector valve are functionally related, and placing them next to each
other facilitates a natural "flow" when performing various
checklist procedures. Also, having the fuel pump switch away
from any other switches ensures that it can be operated safely by
touch without looking, with no danger of mistaking it for a different
switch. The fuel pump switch will have three positions:
"ON" (up), "AUTO" (center), and "OFF"
(down). Normally the switch will be on "AUTO", where
the fuel pump is controlled by the FADEC, except when switching fuel
tanks, emergencies, etc. An annunciator light on the panel or on
the EFIS screen will warn if the switch is in a manual override
position ("ON" or "OFF").
Owen at Andair advised me that their FS20X7T is the best choice for
the RV-7A, as it was designed to fit without too much trouble into the
existing design. As Van's now carries these, I bought one
through them. Although I'm very happy with the quality of the
valve, it seems that the choice of fittings on it could have been
better. It has all built-in fittings for flared tubing, which
leaves little flexibility. Female pipe fittings would have been
better, so that any of a number of standard AN fittings could have
been used to direct the ports before going to a tubing run. In
particular, the output port from the fuel valve needs to immediately
tee off to the fuel filter and a return from the pressure regulator
valve. Being a flared tube fitting on the Andair valve, I had to
get a female swivel fitting with the appropriate tee. This is an
AN-like fitting, but is non-standard and hard to find.
"Luckily", Van's now carries these (Van's p/n "F SWIVEL
TEE") at twenty bucks a pop. |
| 2006.07.30:
(3.0) Made two more fuel
lines. One from the fuel selector valve tee to the fuel
filter. Another from the pressure regulator valve back to the
fuel selector valve tee.
 |
| 2007.??.??:
(0.0) [This entry covers
the past few weeks] Moving on to the left and right fuel lines
to the fuel selector, I found that I simply couldn't make the geometry
work. The "flared tube elbow fittings" on the Andair
FS20X7T would work great on a carbureted RV, but for a fuel-injected
RV like mine, the tubes and fittings on the Airflow Performance
high-pressure fuel pump interfere with the lines coming off the fuel
selector. A quick discussion
on the Van's Air Force (VAF) forums confirmed the diagnosis, and
the best cure others have found are the Andair BF20 "banjo
fittings" instead of the elbow fittings. Exchanged a few
emails with Owen at Andair, who also suggested the banjo fittings, and
offered to swap. |
| 2007.??.??:
(4.0) Received the Banjo
fittings from Andair, which indeed made the fuel line routing more
feasible. |
| 2007.05.18:
(4.0) Made the in-cockpit tubing for the
left fuel tank vent. First used copper wire to model the rough
shape, then bent and fitted the actual 1/4" aluminum
tubing. Note that the location for the bulkhead fitting that
goes through the side skin to the wing has still not been precisely
determined, so I left that end long for now. The location for
the fitting is not precisely shown in the plans, nor is there a
pre-punched pilot hole as stated in the plans. Since it's a
fairly tight area near the leading edge of the wing, I'll wait until I
have the wings on to determine the precise location for the fitting.
 |
| 2008.05.28:
(0.0) Modified a pair of AN bulkhead
fittings to use as the fuel tank vents. Took off the thread on
one side with Vay's lathe, and also thinned out the flange some to
reduce drag. Then I cut a 45 degree angle on the bandsaw, and
cleaned it up with a file. Came out pretty nice.
 |
| 2011.09.29:
(0.0) The lengths of fuel hoses
supplied with Van's firewall forward kit did not fit my particular
installation, so I returned them and instead had custom hoses made by Precision
Hose Technology, Inc. of Tulsa, OK. And since I'm having
them custom made anyway, I also used a better more modern type of
hose. Van's uses Aeroquip AE701, which is a synthetic rubber
hose with stainless steel braid jacket, and a slip-on
firesleeve. It is rated for operating pressure up to 1000 psi,
and temperature of -65° to 300° F. The hose type I selected is
Parker Stratoflex 124J. This is a teflon hose with stainless
steel braid jacket and integral firesleeve. This hose is rated
for operating pressure up to 1500 psi, and temperature of -65° to
+450° F (-54° to +232° C). And whereas synthetic rubber hose
has to be replaced every few years, teflon hose has virtually infinite
service life. It is well suited for firewall-forward fuel lines,
and is often used as such in certified aircraft.
The hose specifications I used in my installation:
Firewall to engine-driven fuel pump:
3/8" ID (-6), straight to 45° elbow, 9.0 inches long, p/n
124J003-6CR0090
Engine-driven fuel pump to fuel injection servo:
3/8" ID (-6), straight to straight, 26.5 inches long, p/n
124J001-6CR0264 |
|
|
